Aug 24, 2025 | 6 min read
Custom Domains: A Key Part of Branding
- Custom Domain for Emails |
- Custom Domain for One Website |
- Custom Domain for Event Apps |
- Custom Domains for Multiple Websites |
- Expedite DNS Record Changes Effect
Eventact lets you use your own domain name for the key attendee-facing touchpoints: emails, websites, and the event app.
- Email Sending: Use your own domain so participants recognize your organization as the sender.
- Event Websites: Build and host your websites on your private domain or subdomains.
- Event Apps: Run your mobile event apps on your own branded URL.
Using your own domain name reinforces your brand identity, builds trust with attendees, and creates a cohesive professional experience. This guide walks you through the technical steps to set up these custom domains in Eventact.
Custom Domain for Emails
Receiving email servers verify that the sending server is authorized to send email on behalf of the domain it claims to represent. To ensure your emails sent through Eventact reach recipients’ inboxes, your domain needs three DNS records configured:
- SPF (Sender Policy Framework): Specifies which mail servers are authorized to send email on behalf of your domain.
- DKIM (DomainKeys Identified Mail): Adds a digital signature to your emails, allowing receiving servers to verify authenticity and detect tampering.
- DMARC (Domain-based Message Authentication, Reporting, and Conformance): Defines what receiving servers should do when an email fails SPF or DKIM checks, and where to send failure reports.
You may need to involve your IT team to add or update these DNS records. The sections below walk through each one.
Updating Your SPF Record
SPF is a special DNS record that lists the authorized email servers for your domain. To allow Eventact to send emails on your behalf, you need to include _spf.eventact.com in your SPF record.

Here’s how to update your SPF record:
-
Get the updated SPF record:
- Go to the "Project Settings" in your Eventact project settings.
- Select "Email and Phone" and enter the email address you want to use as the sender.
- Click "Test." Eventact will check your domain and provide you with an updated SPF record if needed.
-
Update the SPF Record:
Important: Updating the SPF record or any DNS records can affect email deliverability or even make your website unavailable if done incorrectly. Only proceed if you fully understand the process and its implications.- Log in to your domain registrar’s or web hosting control panel, then locate the DNS management section.
- If you’re unsure where to find it, log in to your domain registrar (where you purchased the domain) or your web hosting control panel (the interface provided by your hosting service).
- Look for a section labeled "DNS Management," "Domain Records," or a similar title. This section lists all the DNS records for your domain, each with a type (e.g., A, CNAME, TXT, or MX).
-
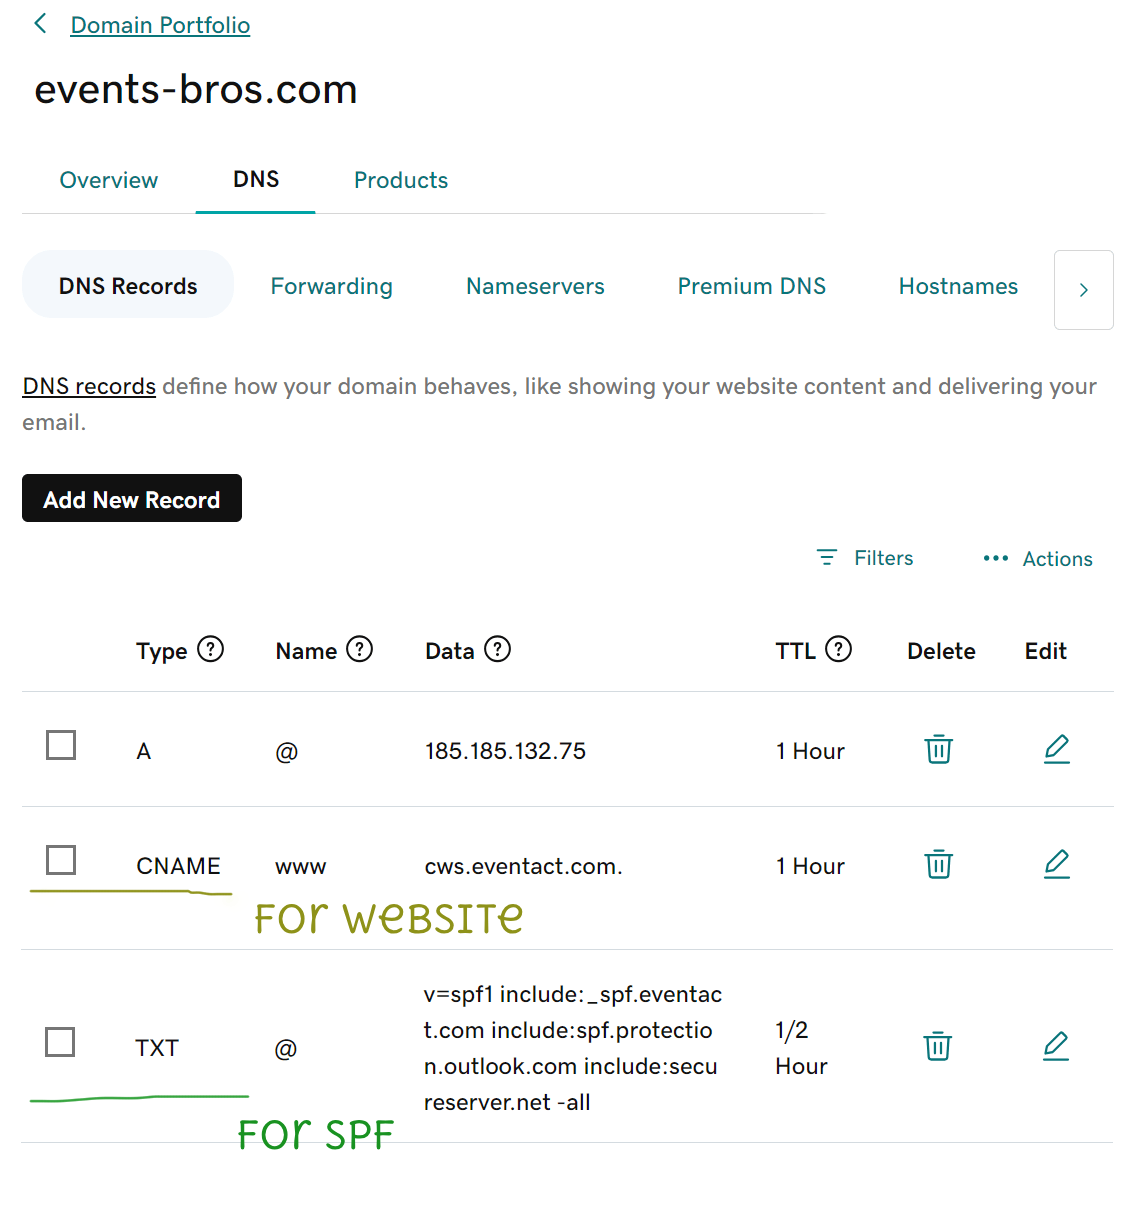
Locate or create a TXT record for your SPF settings. If an existing TXT record starts with "v=spf1," this is your SPF record. If you have more than one, consult Eventact or your IT department before proceeding.
A domain can only have ONE SPF record. If you have more than one, mail is likely broken — contact your IT to resolve this. - Edit or enter the value provided by Eventact in the test results, which should include "include:_spf.eventact.com."
- Save the changes
-
Verify the Update:
- Return to Eventact.
- Go to "Project Details" and the "Email and Phone" page, then click "Test" again to verify the update.
Using DKIM
What is DKIM?
DKIM works alongside SPF to further protect your sending reputation. When you send an email, your mail server adds a unique digital signature to the message. The recipient’s mail server uses this signature to verify the email’s authenticity and confirm it hasn’t been tampered with in transit — helping prevent spoofing and reducing the chance that your emails will be flagged as spam.
A Few Things to Keep in Mind:
- DKIM and SPF together: Using both provides a stronger defense against spam and improves your overall sender reputation. Major email providers such as Google and Yahoo now require DKIM for bulk senders, so this is no longer optional for most organizations.
- Multiple records: A single domain can have multiple DKIM records if you use more than one service to send emails. Make sure to add the correct record for each sending service you use, including Eventact.
Setting Up DKIM in Eventact
Follow these steps to set up DKIM for your organization’s domain:
- Sender Email Setup: Ensure the sender email address you want to use is configured within your event settings.
- Navigate to Company Settings: Go to the company/organization level of your Eventact account.
- Access Email Settings: From the left-hand menu, click Company, then Email. This page lists all domains used for sending emails and displays their current DKIM status.
-
Add a TXT Record: The Eventact page will display the value for a new DNS TXT record. Using your domain registrar’s portal, add this TXT record to your domain’s DNS settings.
The record will look something like this:- Name/Key: ea23431._domainkey.event-bros.com
- Value: v=DKIM1; k=rsa; p=MIGEAAEACSqGSIa3AAQEBAACTAGNEACBiQKBgQC3...
- Verify and Activate: After adding the record, return to the Eventact email page. Eventact will verify the record. Once the DKIM status is confirmed as correct, you can activate the DKIM signature for your outgoing emails.
- Test Your Setup: To confirm everything is working correctly, send a test email from Eventact. You can then verify the outgoing email’s DKIM status using an online service, such as https://dkimvalidator.com/
Setting Up DMARC
DMARC is a domain-wide policy that applies to all email sent from your domain — not just email sent through Eventact. Because of this, configuring DMARC is the responsibility of your domain or IT administrator and is outside the scope of this guide.
What you should do is confirm with your IT team that a DMARC record is already in place for your domain. Major email providers such as Google and Yahoo require a valid DMARC record for bulk senders, so this is an important step even if Eventact is not directly involved in setting it up.
To verify whether your domain has a DMARC record, you can use a free tool such as MXToolbox DMARC Lookup.
If your IT team hasn’t set up DMARC yet, a basic ‘p=none’ policy is usually sufficient to meet new sender requirements without affecting your current email flow.
Custom Domain for Websites
For sites you build in Eventact, you have three options for your event website URL:
- Eventact’s default domain — Eventact provides a default domain followed by a unique keyword for your event (e.g., https://ws.eventact.com/ideas). No setup required.
- A dedicated custom domain per event website — link a unique domain or subdomain to each website you create in Eventact.
- One shared custom domain for all your event websites — use a single subdomain as the base for all your event websites (e.g., events.event-bros.com/tech-summit24, events.event-bros.com/med-summit). Recommended: your IT team sets up the DNS record once, and every new event website you publish is immediately available under that domain — no additional DNS work required, and no extra domain fees.
Options 2 and 3 require DNS configuration, covered in the sections below. If you’re setting up a custom domain for the first time, option 3 is the better long-term choice for most organizations.
Comparison Table
| Feature | Default Domain | Dedicated Domain | Shared Subdomain (Recommended) |
|---|---|---|---|
| URL Example | ws.eventact.com/event | www.myevent.com | events.event-bros.com/event |
| Setup Effort | Zero | High (Every event) | Medium (Once only) |
| Brand Impact | Low | High | High |
Option 1 — Eventact’s default domain
No DNS setup is needed.
Option 2 — Dedicated Domain for a Single Event Website

Create a CNAME record pointing your domain to ws.eventact.com:
- Log in to your domain registrar’s control panel and locate the DNS management section.
- Find the list of existing DNS records (each has a type: A, CNAME, TXT, MX, etc.).
-
Add a new CNAME record with the following values:
- Host/Name: the subdomain you want to use (e.g., xyz for xyz.event-bros.com)
- Type: CNAME
- Value/Target: ws.eventact.com
- TTL: 900 (15 minutes — keeps future changes propagating quickly)
- Save the record.
- Verify: ping your subdomain and ping ws.eventact.com — the IP addresses should match.
Once the record has propagated, go to the website settings page in Eventact and enter your domain name there.
Option 3 — One Shared Domain for All Event Websites
Create a CNAME record pointing your subdomain to ccws.eventact.com. You only need to do this once — every new event website you create in Eventact will automatically be available under this subdomain.
- Log in to your domain registrar’s control panel and locate the DNS management section.
- Find the list of existing DNS records.
-
Add a new CNAME record with the following values:
- Host/Name: the subdomain prefix you want to use (e.g., events for events.event-bros.com)
- Type: CNAME
- Value/Target: ccws.eventact.com
- TTL: 3600 (1 hour)
- Save the record.
- Verify: ping your subdomain and ping ccws.eventact.com — the IP addresses should match.
Once propagated, go to the company-level page in Eventact, select Settings → Advanced Options, and add the following:
- Key: runWebsites
- Value: your custom domain (e.g., events.event-bros.com)
Expedite DNS Record Changes Effect
When you update DNS records, it can take anywhere from a few minutes to several hours for those changes to become active across the internet. The exact propagation time depends on the Time-to-Live (TTL) settings for your DNS records and the caching policies of the various DNS servers. The TTL setting specifies how long a DNS server should cache a record before checking for a new one. A shorter TTL will result in faster propagation of changes.
Steps to Speed Up DNS Changes
-
Request Cache Flushes from DNS Providers.
To make changes visible faster, you can manually request DNS providers to flush their cache: -
Clear Your Local DNS Cache
On Windows:- Open the Command Prompt (CMD)
-
Enter the following command:
ipconfig/flushdns
Custom Domain for Event Apps
Eventact’s Event App is a Progressive Web App (PWA), which can be accessed via a URL without installation. You can use your own domain as the Event App URL by creating a CNAME record pointing to f2f.eventact.com.
Set Up the App’s Custom Domain:
- Create a CNAME record for your chosen subdomain (e.g., app.event-bros.com pointing to f2f.eventact.com). For guidance, see the website custom domain CNAME instructions above.
- Log in to Eventact and go to the company-level page.
- Select Settings on the left-side menu.
- Click Options, then Advanced Options.
-
Edit or add the following setting:
- Key: runface2Face
- Value: your custom domain (e.g., app.event-bros.com)
Your Feedback is Welcome – We’re Here to Help!
We hope this guide has been helpful and clear. If you have any further questions or suggestions, please don’t hesitate to contact us.